How will you use the Add Media feature to enhance your next Explain Everything project?
Showing posts with label Creativity. Show all posts
Showing posts with label Creativity. Show all posts
Monday, May 13, 2019
Adding Content to Explain Everything
I have spent more time diving into the deep end of Explain Everything. You know you can insert images, videos, and audio. But wait, there is so much more! Did you know you can insert equations? What about different files that are already created? And clipart that is already a part of Explain Everything? And then there are the placeholders! Here's a quick video to show you how! Hope you enjoy!
How will you use the Add Media feature to enhance your next Explain Everything project?
How will you use the Add Media feature to enhance your next Explain Everything project?

Thursday, March 21, 2019
Podcast: Creativity
Wow! I'm really excited about this episode of our podcast because we were able to speak to a few of the learners from our district and hear directly from them what creativity means to them! It is really interesting to hear the concept of creativity evolve from a young elementary child to a young adult! Listen to this episode to hear some of our ideas on how you can help encourage creativity in your classroom. Then share your own thoughts on Twitter using #coppelldlc!

Thanks for listening!
Tuesday, February 12, 2019
Getting Creative to Add Pizzazz
My team and I have been working to help educators feel more comfortable using iWorks with their learners. One of the pieces I am trying to share with educators is using Numbers as a workflow guide. The idea is that each sheet is 1 step for the directions. Within the document you can create links to outside resources, step by step directions, and anything you want your learners to have access to in order to support the project.
One thing in particular is naming the individual sheets. Did you know if you are using a MacBook you have an emoji keyboard built in? All you have to do to access this gem is press Control, Command, and the Space bar all at the same time. Then...just like magic you can insert an emoji!


What "tricks" do you like to use to make your documents shine?
One thing in particular is naming the individual sheets. Did you know if you are using a MacBook you have an emoji keyboard built in? All you have to do to access this gem is press Control, Command, and the Space bar all at the same time. Then...just like magic you can insert an emoji!

Take a look of this example of emojis used within naming each sheet. Try it! It will make your day!

Another thing you can try is adding "fancy" titles! Fonts is another little thing that can make you feel happy about your documentation. I found a solution of using Canva to create the title. Check out this video to see how.
Thursday, January 10, 2019
Breaking Apart
Have you ever found a great resource, but then wanted to change it up just a little bit to make it more unique? I do all the time! Recently I learned about the Break Apart feature found in iWorks (Keynote, Numbers & Pages). You might already know this little trick, but it's new to me so I want to share! Check out this video to see how...
Now, how are you going to use this feature?
Friday, October 26, 2018
Everything Tips!
Explain Everything is one of my favorite apps right now because you can do...well...everything with it! You can add images, videos, create actions while putting together a video, and list goes on! I like how you can have multiple slides in one project but don't forget about the infinite white space of each slide.
While I've been experimenting with Explain Everything I have put together 5 tips to keep in mind when using the app to record your voice.

While I've been experimenting with Explain Everything I have put together 5 tips to keep in mind when using the app to record your voice.

And another very important point to keep in mind is to always save or backup your work. Nothing is worse than putting all of your energy into a project and then have part of it disappear. Really, how do projects show up one day and then they are gone the next? Sometimes an app will have glitches, but I don't want to lose my work. There are several options for integrating other apps with Explain Everything, but I am selecting Google Drive as my source for saving and backing up my projects. Explain Everything allows projects to be exported as a video, document, image, or project. While I'm still working on it, I will use the Project file type to save to Drive. When I am completely done with a project I will save it as a video or an image depending on what I want to do with the project. Watch this video to see how to connect Explain Everything to Drive and export a project.
I can't wait to see more projects created in Explain Everything! Have you tried it lately?
Thursday, July 19, 2018
Chrome Book Creator: Real Time Collaboration
I watched another Book Creator webinar by Monica Burns from Class Tech Tips to learn more about the real-time collaboration aspect of Book Creator. To be clear and upfront, the real-time collaboration is a newer feature for Book Creator and is also part of the paid version. Look closely at the different price ranges Monica shared during the webinar.

One question Monica asked the participants is how are your learners already using collaboration in your classroom? A few of the answers were Flipgrid, Padlet, and G Suite for Education. Collaboration is an important skill we must practice and practice with learners. Collaboration is probably already happening in your classroom, but how are you asking learners to work together? Maybe learners are all reflecting on a common topic or experience. Maybe learners are brainstorming and inspiring each other. Maybe learners are all contributing a portion of a book to create a larger scale end product. Have you ever thought about the different ways learners collaborate? I thought it was interesting the graphic Monica shared to explain the different types of collaboration.

To specifically use the real-time collaboration feature there are a few steps to get up and running for your learners
1. Create a teacher shared library
2. Through settings, invite users to join your book using an invite code
3. When you are finished with the collaboration aspect, turn off collaboration
Notice the blue outline to show where you are working on a page.

Also, with each learner having their own page, you can monitor progress all at once!
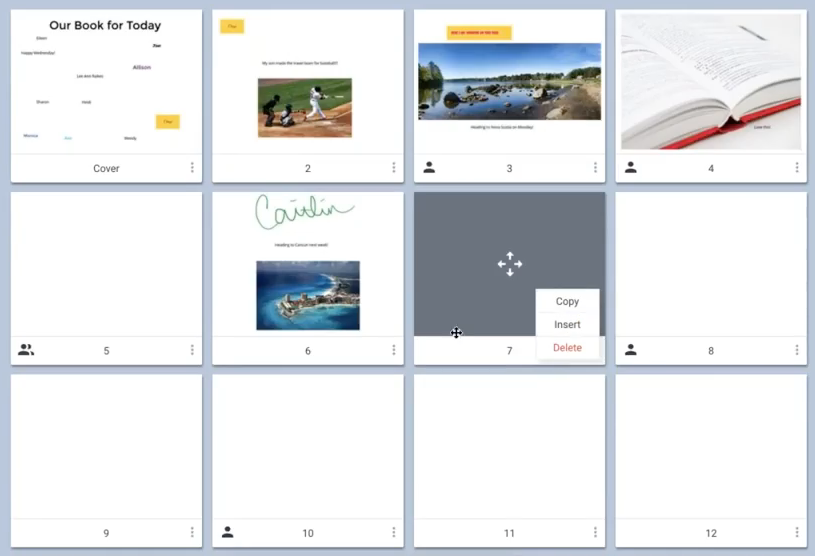
Some other tips to keep in mind when working in a collaborative space:
1. Set very clear expectations for what work should be done
2. Create and assign each learner a different page to add their work
3. Assign which pages each learner will provide feedback for their classmates
4. Turn off the collaboration feature when learners are no longer working in the shared space in order to avoid work being edited by someone else.
Feedback can come in 2 different styles when using Book Creator. Learners can create a new text box to type a response; or, learners can use the audio recording feature to share verbal feedback. Either way, once the person has received their feedback they can then delete that particular feature from their own page. With some many different tools to use learners will enjoy creating and sharing!
I really enjoyed this webinar and it helped me to see what other types of possibilities are available when using Book Creator. Thank you, Monica! How would you like to use the real-time collaboration piece?

Monday, March 19, 2018
An Apple a Week Podcast Series: Creating with Clips
On this podcast episode of An Apple a Week we take a closer look at the app Clips!

Look at the blogpost written by Ali to see it in writing then listen to the episode where our DLC teammate Sam joins us to tell us about her experience with Clips.
Follow @Clipsiration on Twitter to be inspired by others who are already using Clips! How will you use Clips to share information with your learners?
Look at the blogpost written by Ali to see it in writing then listen to the episode where our DLC teammate Sam joins us to tell us about her experience with Clips.
Follow @Clipsiration on Twitter to be inspired by others who are already using Clips! How will you use Clips to share information with your learners?
Thursday, February 15, 2018
Choices
We have so many choices. Sometimes there are too many and it's difficult to make a choice. While I was at TCEA I had the opportunity to go to a session to learn more about Adobe Spark. I am very excited to hear Adobe will be changing their terms of service so that any age learner can use their products, for free! This got my attention! I have used Adobe Spark before and thought it was easy to use, easy to navigate, and I liked the final product I created.

That got me thinking, what about Apple Clips? Clips is a native app for iOS devices. This is great because that means all of our learners have access to the app. There is no sign-in and you do not have to be connected to the internet. I have made a few graphics to help learners create their own Clips.


That got me thinking, what about Apple Clips? Clips is a native app for iOS devices. This is great because that means all of our learners have access to the app. There is no sign-in and you do not have to be connected to the internet. I have made a few graphics to help learners create their own Clips.

There are so many possibilities with Clips in the classroom! Here is a quick video I made with my amazing teammate, Alli Pryor, to encourage our PLN to try using Clips.
I'm so excited to see up and coming projects by educators and learners using Clips!
Tuesday, January 30, 2018
Infographics for the Classroom
I love graphics! I love looking at an image to see what information is being communicated. From reading my blog, you also know how much I LOVE Google Drawings!! Drawings is my "go to" for most things! Lately I have suggested to educators to have learners create infographics for various projects in their classrooms. Our leaners have access to iPads and unfortunately Drawings is not available to be used on an iPad. So, what other programs do I suggest?
How about Pages? Pages is *FREE* for users on iPads! It has some very powerful options when you are wanting to add shapes and text. It is also does not require wi-fi and can be downloaded as a PDF. Quick and easy!
How about Canva? Canva requires wi-fi and learners can log in using their Google account. There are preset templates and there is freedom to customize your graphics. Canva can be downloaded as an image or a PDF.
How about PiktoChart? Pickto Chart also requires wi-fi and learners will need to log in using their Google account. There are many templates perfect for creating infographics, but you can also customize your work! PicktoChart can be downloaded to Photos.
How about Pic Collage? Is there anything Pic Collage cannot do? Ha! Ha!! Pic Collage does not require wi-fi or a log in. This tool is is easy to navigate with suggested templates or create freestyle layouts. Pic Collage can be shared as an image in Photos.
When learners are beginning to work on a project I have this graphic to help them decide where to start:

After learners have completed their work I have this graphic to help them export their image for sharing:

How about Pages? Pages is *FREE* for users on iPads! It has some very powerful options when you are wanting to add shapes and text. It is also does not require wi-fi and can be downloaded as a PDF. Quick and easy!
How about Canva? Canva requires wi-fi and learners can log in using their Google account. There are preset templates and there is freedom to customize your graphics. Canva can be downloaded as an image or a PDF.
How about PiktoChart? Pickto Chart also requires wi-fi and learners will need to log in using their Google account. There are many templates perfect for creating infographics, but you can also customize your work! PicktoChart can be downloaded to Photos.
How about Pic Collage? Is there anything Pic Collage cannot do? Ha! Ha!! Pic Collage does not require wi-fi or a log in. This tool is is easy to navigate with suggested templates or create freestyle layouts. Pic Collage can be shared as an image in Photos.
When learners are beginning to work on a project I have this graphic to help them decide where to start:

After learners have completed their work I have this graphic to help them export their image for sharing:

Have you asked your learners to share their learning through infographics? If not, why not try it now?
Subscribe to:
Posts (Atom)